Integrate external 3rd Party Support into your Jira Service Management using the "Collaborators" Function
- Benjamin Dombrowsky

- Aug 20, 2024
- 4 min read
Updated: Aug 21, 2024

Managing support processes within Jira Service Management (JSM) can be complex, especially when involving external third-party vendors or collaborators. To ensure smooth and secure collaboration, Jira offers the "Collaborators" function, which, when combined with a carefully designed security scheme, allows you to control the visibility of issues for external service providers. In this post, we'll guide you through setting up a secure and efficient environment for external collaborators in JSM, using a custom security level to restrict access to sensitive information.
For the path described here, 3rd level support is created as a Jira user. This way, however, no Jira Service Management Agent license is required, it is sufficient if it is licensed as a simple Jira user, since we use the Collaborators function. You can find out more about this function at Atlassian: https://support.atlassian.com/jira-service-management-cloud/docs/what-users-and-roles-are-there-in-jira-service-management/

Step 1: Creating a Dedicated Role for External Collaborators
The first step in integrating third-party support into your JSM project is creating a dedicated role, such as "Service Desk Collaborators." This role will be specifically assigned to external users who need access to the project.
Create a New Role: Navigate to your JSM project settings and create a new role named "Service Desk Collaborators."
Assign Users or Groups: You can assign individual users or entire groups to this role, depending on your needs.
This role will define the basic permissions for external users, allowing them to collaborate on issues without granting them unnecessary access.
Step 2: Configure the Permission Scheme
Once the role is created, you need to configure the Permission Scheme to ensure that the "Service Desk Collaborators" have the correct level of access.
Access the Permission Scheme: Go to the project settings and select the Permission Scheme associated with your JSM project.
Grant Permissions: Add the "Service Desk Collaborators" role to the relevant permissions, such as "Browse Projects" and "Comment on Issues," but avoid granting them access to permissions that allow broader visibility or control over the project.
This configuration ensures that external collaborators can interact with the issues they are involved in without exposing other sensitive information within the project.

Step 3: Add External Users to the Project
Now that the role and permissions are set up, you need to add your external users to the project.
Create a New Jira User: Create a new Jira user for your external collaborator. This user will need a Jira license, but not necessarily a JSM Agent license.
Assign the User to the Role: Add the newly created user to the "Service Desk Collaborators" role in your JSM project.
Important: At this point, the user has the potential to see all issues within the project. To prevent this, we must configure a security level.

Step 4: Setting Up a Security Level
To restrict the visibility of issues, we’ll set up a security level that ensures external users can only see issues they are explicitly granted access to.
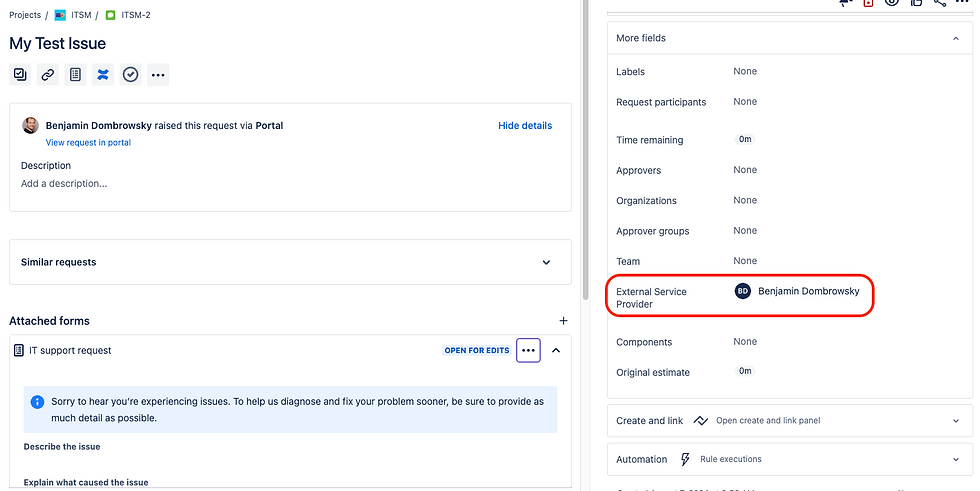
Create a Custom Field: Create a custom field named "External Service Provider" of type UserPicker. This field will be used to select the external collaborator for specific issues.
Add the Custom Field to Screens: Ensure that the "External Service Provider" field is added to the necessary screens so that it can be used during issue creation or editing.
Configure a Security Level Scheme:
Create a new Security Level Scheme.
Within this scheme, create a security level (e.g., "Collaboration with 3rd Party") that includes the Service Desk Team (but not the Collaborators).
Add the "External Service Provider" custom field to this security level, allowing access only when the specific external user is selected.
Set Default Security Level: Make this security level the default for all new issues. This is crucial to prevent external users from accidentally viewing issues they shouldn’t have access to.

Step 5: Apply Security Levels to Existing Issues
To ensure that all existing issues adhere to the new security settings, apply the security level to all existing issues:
Use the Bulk Change Function: Perform a bulk operation to set the default security level for all previously created issues.
Now, all issues will have the appropriate security level, preventing external collaborators from seeing issues unless they are specifically granted access.
Step 6: Granting Access to Specific Issues
Finally, to allow an external collaborator to view and work on an issue:
Select the User in the Custom Field: When you want an external collaborator to see an issue, select them in the "External Service Provider" field.
Save the Issue: Once selected, the collaborator will have access to that specific issue, but no others.
This approach ensures that external collaborators can only see and interact with the issues that you explicitly assign to them, maintaining the confidentiality of your other project data.

Conclusion
Integrating external third-party support into your Jira Service Management environment can significantly enhance your service capabilities while maintaining security and control over your project data. By leveraging the "Collaborators" function and setting up a robust security level scheme, you can ensure that external service providers have the access they need - no more, no less.
This method not only enhances collaboration but also safeguards your internal processes, making it an essential practice for any organization working with external partners.


